【原创】Vue多页应用模式的搭建
在vue-cli单页面的基础上去改造为多页面,个人的观点是可以将几个主要模块的入口改为一个新的页面比较合适,如果每个页面都变成新的页面,那么整个项目的框架就会变得稍微复杂一点,也就失去了Vue本身的优势,毕竟单页应用不刷新页面的体验还是比较好的哦,于是乎,个人就参照网上的一些方案,然后自己动手测试了一下!【PS:可以先来看看这个简单的DEMO,属于混合形式的,主模块入口页面属于新页面,每个主模块又属于一个单页面】
具体参照的例子为:基于vue-cli,使用vue2.3.3 + webpack2 + es6 + vuex2.3.1 + scss的脚手架
1、修改框架目录结构:去掉根目录的index.html,去掉src下的router、App.vue、main.js。
# 全局安装 vue-cli$ npm install –global vue-cli# 创建一个基于 webpack 模板的新项目multipage$ vue init webpack multipage# 安装依赖,走你$ cd multipage$ npm install$ npm run dev
2、改写JS:
1)修改config/index.js
var path = require(‘path’)module.exports = {moduleName:‘pages’, // 定义模块名称pathString:{root: path.resolve(__dirname, ‘../’),// 定义根路径src: path.resolve(__dirname, ‘../src’) // 定义主文件路径},build: { …… },dev: { …… }}
2)修改build/webpack.base.config.js
// 由原来一个入口module.exports = {entry: {app: ‘./src/main.js’}}// 改为多入口var entries = utils.getEntries(config.pathString.src+‘/’+config.moduleName+‘/**/*.js’);module.exports = {entry:entries}
3)在build/utils.js追加getEntries方法
var glob = require(‘glob’) // 这个一定要引入才行exports.getEntries = function (globPath) {var entries = {},basename, tmp, pathname;glob.sync(globPath).forEach(function(entry) {basename = path.basename(entry, path.extname(entry));tmp = entry.split(‘/’).splice(-3);pathname = tmp.splice(0, 1) + ‘/’ + basename; // 正确输出js和html的路径entries[pathname] = entry;});// console.log(“dev-entrys:”);// console.log(entries);return entries;}
4)修改build/webpack.dev.config.js
// 要注释掉的代码// https://github.com/ampedandwired/html-webpack-plugin// new HtmlWebpackPlugin({// filename: ‘index.html’,// template: ‘index.html’,// inject: true// }),// 要增加的代码var pages = utils.getEntries(config.pathString.src+‘/’+config.moduleName+‘/**/*.html’);for (var pathname in pages) {console.log(“filename:” + pathname + ‘.html’);console.log(“template:” + pages[pathname]);// 配置生成的html文件,定义路径等var conf = {filename: pathname + ‘.html’,template: pages[pathname], // 模板路径minify: { //传递 html-minifier 选项给 minify 输出removeComments: true},inject: true, // js插入位置chunks: [pathname] // 每个html引用的js模块,也可以在这里加上vendor等公用模块};// 需要生成几个html文件,就配置几个HtmlWebpackPlugin对象module.exports.plugins.push(new HtmlWebpackPlugin(conf));}
5)build下添加文件entries.js【为了解决npm run build报undefined错误】
var path = require(‘path’),glob = require(‘glob’);config = require(‘../config’)let globPath = {js: config.pathString.src+‘/’+config.moduleName+‘/**/*.js’,html: config.pathString.src+‘/’+config.moduleName+‘/**/*.html’}//分别获取多页面的js和html路径,剪裁moduleName作为key输出function getEntries (globPath) {var entries = {}, tmp, pathname;glob.sync(globPath).forEach(function (entry) {// 以moduelname作为文件名输出tmp = entry.split(‘/’).splice(-3,2);// 以views/home输出,前台http://localhost:8080/views/home.html这样访问pathname = tmp.join(“/”)entries[pathname] = entry;});return entries;}module.exports = {entriesJs: getEntries(globPath.js),entriesHtml: getEntries(globPath.html)}
6)修改build/webpack.prod.config.js
// 添加的三个声明var entries = require(‘./entries’)var entriesJs = entries.entriesJsvar chunks = Object.keys(entriesJs);// 需要修改和注释的位置plugins: [// extract css into its own filenew ExtractTextPlugin({filename: utils.assetsPath(‘css/[name].[contenthash].css’),allChunks: true}),// generate dist index.html with correct asset hash for caching.// you can customize output by editing /index.html// see https://github.com/ampedandwired/html-webpack-plugin// new HtmlWebpackPlugin({// filename: process.env.NODE_ENV === ‘testing’// ? ‘index.html’// : config.build.index,// template: ‘index.html’,// inject: true,// minify: {// removeComments: true,// collapseWhitespace: true,// removeAttributeQuotes: true// // more options:// // https://github.com/kangax/html-minifier#options-quick-reference// },// // necessary to consistently work with multiple chunks via CommonsChunkPlugin// chunksSortMode: ‘dependency’// }),// split vendor lib into its own file// new webpack.optimize.CommonsChunkPlugin({// name: ‘vendor’,// minChunks: function (module, count) {// // any required modules inside node_modules are extracted to vendor// return (// module.resource &&// /\.js$/.test(module.resource) &&// module.resource.indexOf(// path.join(__dirname, ‘../node_modules’)// ) === 0// )// }// }),new webpack.optimize.CommonsChunkPlugin({name: ‘vendor’,chunks: chunks,minChunks: 2 || chunks.length}),]// 添加的方法var pages = entries.entriesHtmlfor (var pathname in pages) {var conf = {filename: pathname + ‘.html’,template: pages[pathname],chunks: [‘vendor’,pathname, ‘manifest’],inject: true,hash:true};webpackConfig.plugins.push(new HtmlWebpackPlugin(conf));}
7)修改build/dev-server.js里面的预览地址
// var uri = ‘http://localhost:’ + port// 修改启动地址,免得每次都要输入var uri = ‘http://localhost:’ + port + ‘/’ + config.moduleName + ‘/index.html’
3、页面结构图如下:
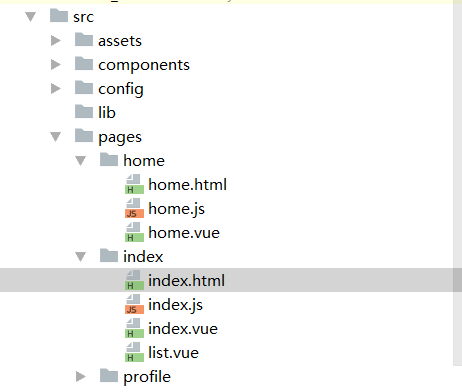
1)index.html的内容如下:
<!DOCTYPE html><html lang=“en”><head><meta charset=“UTF-8”><title>Index</title></head><body style=”font-size:58px;”><div id=“app”></div><div style=”margin-top:150px;text-align:center;”> 此页面为Index页面 </div></body></html>
2)index.js的内容如下:
import Vue from ‘vue’import Index from ‘./index.vue’import List from ‘./list.vue’import VueRouter from ‘vue-router’Vue.use(VueRouter)Vue.config.productionTip = falseconst router = new VueRouter({base: ‘pages’,mode: ‘hash’,routes: [// { path: ‘/’, redirect: ‘/index’ },{ path: ‘/list’, name: ‘list’, component: List }]})/* eslint-disable no-new */new Vue({el: ‘#app’,router,template: ‘<Index/>’,components: { Index, List }})
3)index.vue的内容如下:
<template>
<div id=”app”>
<router-view></router-view>
<div style=”text-align:center;margin-top:50px;”>
<a href=”/pages/home.html”>Home页面</a>
<a href=”/pages/index.html”>Index页面</a>
<a href=”/pages/profile.html”>Profile页面</a>
</div>
<div style=”margin-top:50px;text-align:center;”>
<router-link to=”/list”>列表页面</router-link>
</div>
</div>
</template><script>
export default {
name: ‘app’
}</script>
3)list.vue的内容如下:
<template>
<div id=”list”>
<div style=”text-align:center;”>index-list页面</div>
</div>
</template><script>
export default {
name: ‘list’
}
</script>
4)其他页面内容与此类似
4、npm run build之后的注意事项:
会生成两个文件夹,pages和static,如果放到服务器上的话,需要再新创建一个index.html的文件,用于跳转,代码如下:
<!DOCTYPE html><html lang=“en”><head><meta charset=“UTF-8”><title>多页应用测试</title></head><body><script>window.location.href = ‘/pages/index.html’</script></body></html>
总结:好了,整个结构的修改到此结束了,达到demo那样的效果应该就没啥太大问题了,当然,这个仅是一个简单的demo测试,如果想深入研究的话,估计还得花一段时间呢,等有机会再来研究吧!